

If you’re managing your business books in QuickBooks Online (QBO), you’ve probably come across two ways to record income:
- Entering payments through the “Receive Payment” function
- Entering a bank deposit directly into your checking account
While both might seem like they get you to the same place, using the Undeposited Funds account will help keep your records clean.
Let’s walk through entering deposits into QBO, step-by-step.
Why Use the Undeposited Funds Account?
Before we dive into the “how,” let’s quickly cover the “why.”
When you receive multiple customer payments (checks or cash), you might deposit them together as one deposit at the bank. If you accept credit cards, customer payments are typically deposited into your bank as a batched total.
In QBO, if you enter each payment directly into your checking account, the amounts won’t match your real-life bank deposits. That makes reconciling and matching your bank feed a headache.
That’s where the Undeposited Funds account comes in. It acts like a holding account. Think of it as your virtual cash drawer. You park payments there until you’re ready to record a single deposit that matches what actually hits your bank. Using this method keeps your books clean and matches your bank feed perfectly.
Now that we understand how Undeposited Funds work, let’s discuss the proper way to record customer payments and deposits in QBO.
Step 1: Record the Payment with “Receive Payment”
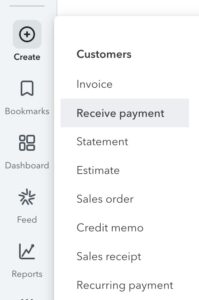
From the Dashboard, go to Create on the left toolbar. Select Receive Payment under “Customers.”
Choose the Customer Name from the dropdown. Once selected, a list of unpaid invoices should appear below. Under Outstanding Transactions, check the box for the invoice(s) being paid.

Make sure the Deposit to field says Undeposited Funds (not your bank account). Fill in the remaining information on your customer payment. (Payment date, method, reference number, etc.)

When finished, click Save and close. Repeat the same process above for each Customer payment.
This step tells QBO, “Hey, I got paid!”, but doesn’t yet put the money in the bank. Let’s record the deposit next.
Step 2: Record the Deposit
Once you’ve received the payments and you’re ready to show that they have been deposited into your bank account:
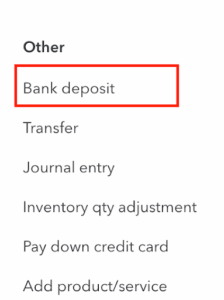
Go to Create. Select Bank Deposit under “Other.”
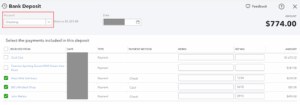
Choose the correct Bank Account (usually your checking account). Under Select the payments included in this deposit, check off the payments you just received. They’re pulled from Undeposited Funds. Confirm the Deposit date matches the actual date the money was deposited.
Scroll down to verify details. You can also add additional funds to a deposit. This section is good for cash received that is not from a customer, such as tax or vendor refunds. You can also add or subtract for things like merchant fees here, if needed.
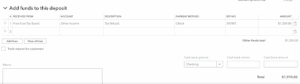
Verify that your deposit total agrees with the deposit amount with the bank. When finished, click Save and close.
Now you’ve matched what happened on the bank side: a deposit entry that agrees with the total amount deposited in your account. Plus, your invoices are marked as paid.
Why Can’t I Just Enter a Bank Deposit?
If you skip the Receive Payment step and go straight to a Bank Deposit, QBO will not mark your invoice as paid, which means your reports will be incorrect, and you’ll think your customers owe you money when they don’t. This is one of the most common mistakes new QBO users make. Additionally, entering bank deposits separately from customer payments can incorrectly inflate your revenue on your Profit & Loss report.
The Undeposited Funds Account is Your Friend
Using Undeposited Funds might seem like an extra step at first, but it’s totally worth it. It keeps your bank reconciliation smooth, ensures invoice tracking is accurate, and helps you avoid recording duplicate income.
Having trouble entering other items in QuickBooks Online? Check out this how-to article discussing how to manage your credit cards in QBO.